title
Support


LEDBlinky Icon LEDBlinky Support and Knowledgebase

How-To's:
How do I configure Other Emulators (not MAME)?
Where can I download the Controls.ini file?
How do I light my Trackball(s) and Joystick(s)?
How do I light the MAME Admin buttons like Pause and Exit?
How do I select which FE buttons light up?
Where can I get the MAME.xml file?
What MAME joystick_map value should I use with my U360(s)?
How do I use LEDBlinky to only map my U360(s) or ServoStik(s) - I don't have any LEDs?
How do I configure LEDBlinky for my Jukebox so the LEDs dance to the music?
How do I change the spoken actions for the Start and Coin buttons?
How do I configure LEDBlinky for Mamewah?
How do I configure LEDBlinky for MameUI (or MAME with an unsupported FE or without any FE)?
How do I upgrade LEDBlinky to work with PinballX?
How do I configure LEDBlinky to use an 8-Way Joystick when my FE is active?

Docs and Info:
Installation and Configuration Guide (pdf)
Animation Editor Guide (pdf)
How does LEDBlinky determine which LEDs to light for a MAME game?
What happens if I select both the 'Light Game Controls' option and the 'Game Play Animation'?

Video Tutorials:
Complete Guide To Get Started.
Part 1 - Initial Configuration.
Part 2 - Animation Editor.
Part 3 - Integration With MAME.
Part 4 - Controls Editor.
Part 5 - Audio Animations.

Fixes:
It's not working, what should I do?
Which versions of MAME work with which versions of LEDBlinky?
There is a long delay when LEDBlinky first starts up?
LEDBlinky does not detect my sound card on the Audio Animation tab?
LEDBlinky does not respond to sounds on the Audio Animation tab?
LEDs light correctly for some MAME games but not for others?
MAME Start/Stop/Pause and other MAME Outputs are not detected?
Player 2 Buttons 5 and 6 do not light up for MAME games?
I'm using a joystick encoder and the game control LEDs do not light correctly?
I'm playing a Trackball game but my Joysticks are also lighting up (or vise-versa)?
MaLa does not correctly light the buttons assigned to the left and right SHIFT/ALT/CTRL keys?
HyperSpin does not light any LEDs?
LEDs return to Front-End Active mode while emulator is still running a game?
Maximus Arcade does not light any LEDs?
Maximus Arcade does not light the LEDs correctly or repeats each animation twice?
"Launch.bat cannot be written..." error with Maximus Arcade?
U360(s) are not changing maps for each game?
Ports on my iPAC Ultimate I/O are lighting mixed colors (yellow, purple, etc.)?
GameEx does not light any LEDs?


How Do I Configure Other Emulators (not MAME)?

This is a manual process (or you can use RocketBlinky, see below). Since there is no way for LEDBlinky to know the control-input mapping (button assignments), or specific controls, or button colors for each emulator or individual game, you must provide the information manually using the LEDBlinky Controls Editor.

LEDBlinky and the Controls Editor provide a number of features to ease the configuration of emulators and games. Each time you play an unknown game (one for which no unique controls are defined), the Emulator and ROM/Game name is stored. From the Controls Editor import menu, you can display the list of unknown games and select which you wish to import. You can then define the controls. Controls for player 1 can be copied to players 2, 3, and 4. If the controls for one game are similar to another, you can copy the entire ROM/Game. It is not necessary to define the controls for every game, using the Controls Editor you can define a default set of controls for each emulator (or even a default for all emulators).

LEDBlinky includes an optional third-party tool called RocketBlinky that can be used to auto-generate an LEDBlinky Controls file that supports over 160 systems. Please see the Readme.txt in the RocketBlinky folder for installation and support options.


Where Can I Download The Controls.ini File?

The lastest known version of the Controls.ini file is now included with the LEDBlinky complete instalation file. The file is also available on the LEDBlinky Downloads page; Controls.ini

Additional information on any updates may be available from the controls.dat support forum.


How Do I Light My Trackball(s) and Joystick(s)?

The easiest way to light your trackball or joystick is to assign one or more of the Primary Control codes to the LED ports (using the LEDBlinky Input Map application). For each trackball, just assign "TRACKBALL". For each joystick assign all the joystick codes that apply to how the joystick will be used. For example, a dedicated 4-way would just be assigned "JOY4WAY" but an 8-way could be assigned all the valid codes; "JOY2WAY", "JOY4WAY", "JOY8WAY", etc. Analog joysticks should be assigned "STICK".

Here's the list of common Primary Control codes:

  • TRACKBALL
  • JOY4WAY
  • JOY8WAY
  • JOY2WAY
  • VJOY2WAY
  • JOYDIAG
  • STICK
  • DOUBLEJOY4WAY
  • DOUBLEJOY8WAY

The downside to using the Primary Control codes is that LEDBlinky will light all the trackballs or joysticks regardless of how many the game actually uses. For example, if your control panel has two illuminated joysticks for Player 1 and Player 2; any game that uses the joysticks will light them both up even if the game is single player or multiplayer alternating (only requires one joystick).

If you want to light the trackballs or joysticks separately based on which are used by each game, then you'll need to assign the Player Specific control codes. For the Player 1 trackball assign "MOUSECODE_1_ANALOG_X" and "MOUSECODE_1_ANALOG_Y". For the Player 2 trackball assign "MOUSECODE_2_ANALOG_X" and "MOUSECODE_2_ANALOG_Y". For each joystick assign all the player specific joystick codes that apply to how the joystick will be used. For example, a Player 1 8-way could be assigned the codes; "JOYCODE_1_UP", "JOYCODE_1_DOWN", "JOYCODE_1_LEFT", and "JOYCODE_1_RIGHT". Actually, you could just use the codes "JOYCODE_1_UP" and "JOYCODE_1_LEFT" since any game that uses one direction always uses the other. A Player 1 analog joystick should be assigned "JOYCODE_1_ANALOG_X" and JOYCODE_1_ANALOG_Y.

Here's the list of common Player Specific Control codes (player numbers range from 1 to 8):

  • MOUSECODE_1_ANALOG_X
  • MOUSECODE_1_ANALOG_Y
  • JOYCODE_1_UP
  • JOYCODE_1_DOWN
  • JOYCODE_1_LEFT
  • JOYCODE_1_RIGHT
  • JOYCODE_1_ANALOG_X
  • JOYCODE_1_ANALOG_Y
  • MOUSECODE_2_ANALOG_X
  • MOUSECODE_2_ANALOG_Y
  • JOYCODE_2_UP
  • JOYCODE_2_DOWN
  • JOYCODE_2_LEFT
  • JOYCODE_2_RIGHT
  • JOYCODE_2_ANALOG_X
  • JOYCODE_2_ANALOG_Y


How Do I Light The MAME Admin Buttons Like Pause And Exit?

If you would like to light up your MAME Administration buttons while playing a MAME game, you'll need to use the LEDBlinky Controls Editor application. On the upper left pane, select "MAME" as the Emulator. On the upper right pane, select "<default>" as the ROM/Game and click "Edit". If you don't have a "<default>" control group, click "New" and check the "Default" box. In the lower pane select the "Common" tab. From here you'll can add whichever MAME Admin controls you want to light up on your control panel. Click "New" to add each button.

screen example

Here are the most common MAME Administration Controls:

  • Open Configure Menu (usually the Tab key) = UI_CONFIGURE
  • Pause (usually the P key) = UI_PAUSE
  • Menu Select (usually the Enter key) = UI_SELECT
  • Exit MAME (usually the ESC key) = UI_CANCEL

For each new control, select the MAME control name from the list. All MAME Admin controls are prefixed with "UI". You must also check the "Always Active" box. And don't forget to set the color or intensity.

screen example

When you're done adding the controls, save the configuration and that should do the trick!


How Do I Select Which FE Buttons Light Up?

When you turn on the 'Light <FE> Controls' option, LEDBlinky will light up all the controls (buttons) you have enabled from your FE's configuration interface.

To modify the intensity or color of any LED, use the LEDBlinky Controls Editor; click the 'FE' button, select the control from the list, then click the 'Edit' button (or just double-click the control). From the Control Edit/Add window you can select a color or set the specific values. Click 'Ok' and Save the configuration.

Here's how to prevent a button from lighting up;

  • If you don't use the FE feature mapped to the button, use the FE configuration interface to disable or unmap that button.
  • If you use the FE feature mapped to the button but don't want it to light up, use the LEDBlinky Controls Editor; click the 'FE' button, select the control from the list, then click the 'Edit' button (or just double-click the control). From the Control Edit/Add window, set the RGB and/or Single LED intensities to zero (0). Click 'Ok' and Save the configuration.

screen example

If you want complete control over which FE buttons light up - here is another option;

  1. Using the LEDBlinky Animation editor, create a new animation.
  2. Set the first (and only) frame to light up the buttons for your desired FE layout.
  3. Save the animation.
  4. From the LEDBlinky Configuration app, on the 'FE Options' tab, select your new animation for the 'FE Active Animation'.
  5. On the '<FE Name> Options' tab, uncheck the 'Light <FE Name> Controls' option.


Where Can I Get The MAME.xml File?

You can use the MAME executable file to generate the ROM list in xml format (MAME.xml). From a Windows command prompt (cmd.exe), execute this command:
<path>\mame.exe -listxml > mame.xml

This will generate the MAME.xml file in the current folder. Move the file to the \LEDBlinky folder and then use the LEDBlinky Configuration app to set the correct path.


What MAME joystick_map Value Should I Use With My U360(s)?

Later versions of MAME will automatically set a joystick map for any analog joystick. So when using U360(s) with mame, technically you don't need LEDBlinky's Joystick Digital Restriction option enabled. One disadvantage of using MAME's analog joystick mapping is that it only works for MAME - so if you're running other emulators you'll need LEDBlinky to set the joystick maps.

By default the joystick_map value in the mame.ini file is set to "auto". This setting when used in conjunction with U360 maps should be fine for most games but may cause issues for Q-Bert (or it's clones). To resolve this problem, edit the mame.ini file using any text editor (Notepad, Notepad++, VS Code, etc.). Locate the joystick_map entry and change it to this:

joystick_map 7778...4445

If you're curious as to what "7778...4445" does - you can read up on the joystick_map options in MAME's doc\config.txt document or check out this thread on the Arcade Controls forum.


How Do I Use LEDBlinky To Only Map My U360(s) or ServoStik(s) - I Don't Have Any LEDs?

Even if you don't have any LEDs, you can still use LEDBlinky to map your U360 and/or ServoStik joystick(s) based on the selected game.

Using the LEDBlinky Configuration application:

  1. Select your front-end software from the "FE" menu. If your FE is not listed, select "Other Front-End".
  2. On the MAME Config tab, set all the required fields. If you selected "Other Front-End" in step 1, check the "Use MAME to Trigger the Game Start/Stop Events" option.
  3. On the Misc Options tab, set the Joystick Digital Restriction options.
  4. Lastly, on the Misc Options tab under Other Options, check the "No LEDs Mode" option.

That's it! There's no need to use any of the other LEDBlinky apps. If you're using one of the integrated front-ends, don't forget to enable LEDBlinky from the front-end configuration. If you're using an unlisted front-end ("Other Front-End"), you'll need to start LEDBlinky before starting your FE. Use this command: "<path>\LEDBlinky\LEDBlinky.exe" 1

One additional note: If you need to configure the U360 or ServoStik for any emulator other than MAME, you will need to use the LEDBlinky Controls Editor app, add a Default control group for each emulator, and add the correct joystick type (4-way, 8-way, etc.) as the Primary Control.


How Do I Configure LEDBlinky For My Jukebox So The LEDs Dance To The Music?

Let's assume you use your front-end software to launch various emulators, and LEDBlinky does its thing - lighting buttons, playing animations, whatever you have configured. Now you've added an emulator which is actually a jukebox application and you want the LEDs to light in sync with the music when the jukebox is active. Here's how to configure LEDBlinky:

Before starting, you'll need to have launched your jukebox software from your front-end at least one time. This is important because it allows LEDBlinky to detect your jukebox as an unknown emulator.

Start the LEDBlinky Controls Editor. From the "Import" menu, select "Unknown Games". On the unknown games list, you should see your jukebox listed (the exact name may differ from the example below).

screen example

Note: If you do not see the jukebox listed and you are sure you've launched the jukebox application at least one time from your front-end, then the front-end may not be configured to run the jukebox the same it runs other emulators. In this case, you will need to modify how the front-end launches the jukebox app. One option may be to use a batch or script file.

Select the Jukebox and click "OK". You will be prompted to confirm if a "<default>" control group should be added for the [Jukebox] emulator. Click "Yes".

screen example

The Controls Editor will display the Jukebox as a new emulator and allow you to edit the "[New ROM/Game] <default>" controls group. Check the "Jukebox" option on the lower left, then click "OK". Click the "Save" menu and close the Controls Editor.

screen example

Next, start the LEDBlinky Configuration app. On the "Game Options" tab, select "<Audio Animation>" from the "Game Play Animation" list. Also check the "Game Play Animation For Jukebox Only" option.

screen example

Lastly, select the "Audio Animation" tab and configure exactly how you want the LEDs to respond to the music. There are a lot of audio options - see the Installation and Configuration Guide for a complete description of all the audio features.


How Do I Change The Spoken Actions For The Start And Coin Buttons?

The voice actions for the Start and Coin buttons are defined globally (all emulators) as "Start Game" and "Insert Coin". You can override the individual voice actions for any emulator or individual game using the Controls Editor;

  1. From the Controls Editor, select the specific ROM/Game or "<default>" control set and click "Edit"

  2. For each player, if the Start and/or Coin buttons already exist, select each control and click "Edit". Then set the "Voice Action" as desired.

  3. If the Start and/or Coin buttons do not exist, click New and select Pn_START, Pn_SELECT (coin), STARTn, or COINn as the "Control" and set the "Voice Action" as desired.

If you ONLY want to use the global default voice actions (ignoring any values specified in the Controls Editor), from the LEDBlinky Configuraiton app, on the "Misc Options" tab, check the "Use Default Start/Coin Voice Actions For All Games" option.

The global default values can be modified by manually editing the settings.ini file located in the \LEDBlinky folder. Using any text editor (Notepad, Notepad++, VS Code, etc.), open the file and locate the [GameOptions] section. Edit the values on the right side of the equal (=) symbol. (Do not alter the value on the left side):

    [GameOptions]
    ...
    SpeakStartButton = Start Game
    SpeakCoinButton = Insert Coin


How Do I Configure LEDBlinky For Mamewah?

Mamewah can launch an external application on FE start and stop, and for Game start and stop. Each emulator has its own ini file. Here's a sample config for LEDBlinky:

Mamewah.ini
### External Application Settings ###
startup_app_commandlines    c:\ledblinky\ledblinky.exe 1 {nowait}
exit_app_commandlines       c:\ledblinky\ledblinky.exe 2 {nowait}
exit_and_run_app_commandlines


Mame.ini
### Execution Settings ###
pre_emulator_app_commandlines  c:\ledblinky\ledblinky.exe [name] mame {nowait}
post_emulator_app_commandlines c:\ledblinky\ledblinky.exe 4 {nowait}
emulator_commandline           c:\mame\mame.exe [name] {nodosbox}


N64.ini
### Execution Settings ###
pre_emulator_app_commandlines  c:\ledblinky\ledblinky.exe "[name]" n64 {nowait}
post_emulator_app_commandlines c:\ledblinky\ledblinky.exe 4 {nowait}
emulator_commandline c:\n64\project64.exe [rompath]\[name].[romext]{nodosbox}{safelaunch}


How Do I Configure LEDBlinky For MameUI (or MAME with an unsupported FE or without any FE)?

If you're using MameUI or any version of MAME with an unsupported Front-End or without any Front-End, you can still use LEDBlinky:

  1. Configure your LED input map using the Generate LEDBlinky Input Map application. See documentation for further details.
  2. Start the LEDBlinky Configuration application.
  3. From the "FE" menu select "Other Front-End".
  4. On the "MAME" tab, fill out all the required values.
  5. On the "MAME" tab, check the "Use MAME to Trigger the Game Start/Stop Events" option.
  6. Configure additional features as desired. For example, on the "Game Options" tab, check the "Light Game Controls" option.
  7. Save and Close the LEDBlinky Configuration app.
  8. Start LEDBlinky using the Windows Run dialog or a script/batch file with this command: "<path>\LEDBlinky\LEDBlinky.exe" 1
  9. Run MameUI (or any version of MAME).

Note: You must always start LEDBlinky prior to starting MAME.


How Do I Upgrade LEDBlinky To Work With PinballX?

As of LEDBlinky version 6.2, PinballX is fully supported. If you are currently using a version prior to 6.2 and wish to upgrade for use with PinballX, additional modifications to the LEDBlinkyControls.xml file are required.

Note: If you are installing the full version of LEDBlinky (not upgrading), nothing additional is required to work with PinballX.

Edit the LEDBlinkyControls.xml file using any text editor (Notepad, Notepad++, VS Code, etc.). Copy and then add the following code to the end of the file after the </baseInputCodes> tag and prior to the </dat> tag.

PinballX XML

  <frontEnd fename="PinballX">
    <controlGroup groupName="DEFAULT" defaultActive="48,48,48,48" defaultInactive="0,0,0,0">
      <player number="0">
        <control name="QUIT" voice="Quit"/>
        <control name="LEFT" voice="Left"/>
        <control name="RIGHT" voice="Right"/>
        <control name="SELECT" voice="Select"/>
        <control name="ROTATE" voice="Rotate"/>
        <control name="PAGELEFT" voice="Page Left"/>
        <control name="PAGERIGHT" voice="Page Right"/>
        <control name="EXITEMULATOR" voice="Exit Emulator"/>
        <control name="SCREENSHOT" voice="Playfield Screenshot"/>
        <control name="SCREENSHOTBACKGLASS" voice="Backglass Screenshot"/>
        <control name="INGAME" voice="Game Pause"/>
        <control name="INSTRUCTIONS" voice="Instructions"/>
        <control name="VOLUMEUP" voice="Volume Up"/>
        <control name="VOLUMEDOWN" voice="Volume Down"/>
      </player>
    </controlGroup>
  </frontEnd>
  <controlDefaults groupName="PinballX" description="Default voice only used by LEDBlinky Controls Editor.">
    <control name="QUIT" voice="Quit"/>
    <control name="LEFT" voice="Left"/>
    <control name="RIGHT" voice="Right"/>
    <control name="SELECT" voice="Select"/>
    <control name="ROTATE" voice="Rotate"/>
    <control name="PAGELEFT" voice="Page Left"/>
    <control name="PAGERIGHT" voice="Page Right"/>
    <control name="EXITEMULATOR" voice="Exit Emulator"/>
    <control name="SCREENSHOT" voice="Playfield Screenshot"/>
    <control name="SCREENSHOTBACKGLASS" voice="Backglass Screenshot"/>
    <control name="INGAME" voice="Game Pause"/>
    <control name="INSTRUCTIONS" voice="Instructions"/>
    <control name="VOLUMEUP" voice="Volume Up"/>
    <control name="VOLUMEDOWN" voice="Volume Down"/>
  </controlDefaults>


How Do I Configure LEDBlinky To Use An 8-Way Joystick When My FE Is Active?

If you use a digitally or physically restricted joystick (UltraStik 360 or ServoStik) to navigate your front-end, by default LEDBlinky will set it to 4-Way when the front-end is active. If you wish to set the joystick to 8-Way (or other), you can override the default using the LEDBlinky Controls Editor:

  1. From the LEDBlinky Controls Editor application, click the 'FE' button (in the middle).

  2. Click the 'New' button on the lower right to add a New Control.

    screen example

  3. On the New Control window, select 'CONTROL_JOY8WAY' from the 'Control' drop-down list. Also check the 'Primary Control' option.

    screen example

  4. Click 'OK', then 'OK', then 'Save' from the menu. That's it!


How Does LEDBlinky Determine Which LEDs To Light For A MAME Game?

Here's the basic logic LEDBlinky uses to determine which LEDs to light up.

  1. You launch a MAME game and the front-end passes a ROM name to LEDBlinky.
  2. The ROM name is used to look up a list of Control Names from the controls.ini data.
  3. If the ROM name is not found in the controls.ini file, LEDBlinky will use the MAME.xml file to get the list of controls.
  4. For each Control Name, LEDBlinky will look through the MAME config (.cfg) files to determine the Input Codes (keyboard and/or joystick) assigned to the control.
  5. For each Input Code, LEDBlinky will use the LED Controller/Port input mapping (as defined by the GenLEDBlinkyInputMap application) to determine which ports on each LED Controller should be turned on.
  • For non-MAME games, the process is similar except that the Control Names and Input Codes are defined using the LEDBlinky Controls Editor.

  • The LEDBlinky Controls Editor can also be used to override the controls for existing MAME ROMs (see 'Import' menu), or to add missing MAME ROMs.

  • The Port Label (defined by the GenLEDBlinkyInputMap application for each port) is used to tie three ports together into a single RGB LED. It is not used in any way when determining which LEDs to illuminate for any given game.


What Happens If I Select Both The 'Light Game Controls' Option And The 'Game Play Animation'?

When the 'Light Game Controls' option is enabled, LEDBlinky will light the active controls for each specific game. For MAME is uses the controls.ini and the MAME.xml files to determine the control list. For other emulators, it uses the control groups specified using the LEDBlinky Controls Editor.

When the 'Game Play Animation' option is enabled, LEDBlinky will play the selected animation whenever an emulator is running.

So what happens when both options are enabled? In this case, LEDBlinky will still light the active controls for each specific game, and any non-active controls will be used for the animation. One possibility for this senario would be to use an audio animation. With the 'Light Game Controls' option enabled and the <Audio Animation> selected as the 'Game Play Animation' option, each game's active controls will light correctly and the remaining non-active controls will blink to the game sounds!


Complete Guide To Get Started.


Part 1 - Initial Configuration.


Part 2 - Animation Editor.


Part 3 - Integration With MAME.


Part 4 - Controls Editor.


Part 5 - Audio Animations.


It's Not Working, What Should I Do?

If LEDBlinky is missing critical information such as a required file or configuration value, a message will be displayed after you exit the application and provide you with the option to display the log file. LEDBlinky logs all errors to the LEDBlinky.log file in the \LEDBlinky folder. These types of problems can be easily resolved by providing the missing files or configuration values.

If LEDBlinky is not displaying any errors, but it's still not working as expected, try using the LEDBlinky Troubleshooting application. The troubleshooting app will attempt to provide solutions for common issues such as the wrong buttons lighting up during game play. The app is self-explanatory and may provide a solution to your issue.

As another option, you can post questions to the Software group on the ArcadeControls.com forum. The current LEDBlinky support thread can be found here. If you start a new thread, please include the word "LEDBlinky" in the subject.

To diagnose complex problems, LEDBlinky can generate a Debug.log file. Debug mode can be enabled from the LEDBlinky Configuration Application on the "Misc Options" tab. Additional Debug_*.log files will also be generated, all of which will be zipped into the Debug.zip file. Using the Debug mode may degrade performance and should only be enabled to actively diagnose a problem.

If you wish to contact me directly, please post a personal message to arzoo on the ArcadeControls.com forum. You can also reach me via email at [email protected].

If you would like my help diagnosing a problem, please follow these steps:

  1. From the LEDBlinky Configuration app, check the "Enable Debug Log" option on the Misc Options tab.
  2. Start your front-end and run through the process that's not working - like start a few games. Then quit your front-end.
  3. Locate the Debug.zip file in the \LEDBlinky folder and email it to me along with an explanation of what's not working.
  4. Don't forget to turn off the "Enable Debug Log" option when you're done.


Which Versions Of MAME Work With Which Versions Of LEDBlinky?

LEDBlinky will work with all versions of MAME. But some LEDBlinky features rely on data from the MAME.xml file and this file occasionally changes format when MAME is upgraded.

  • If you are using MAME.xml version 0.173 or later, you must use LEDBlinky version 6.3.0.0 or later.
  • If you are using MAME.xml version 0.169 or later, you must use LEDBlinky version 6.2.2.2 or later.
  • If you are using MAME.xml version 0.162 or later, you must use LEDBlinky version 6.2.1.0 or later.
  • If you do not wish to upgrade LEDBlinky, you may downgrade your MAME.xml to an older version.
  • LEDBlinky can use a separate MAME.xml file from your other arcade applications.


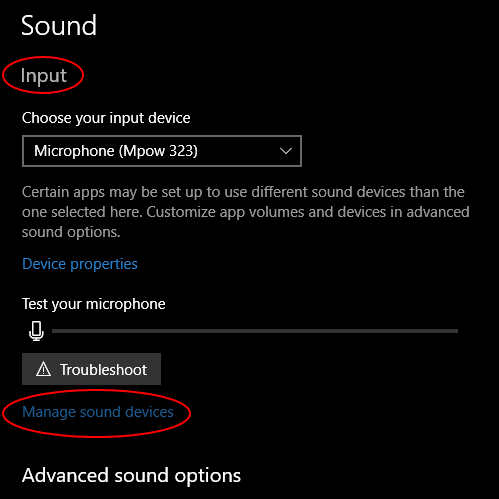
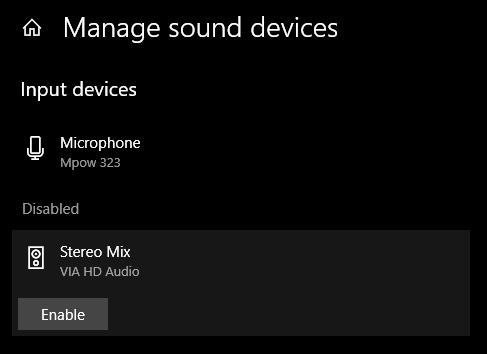
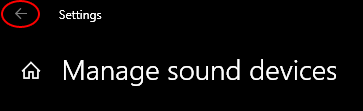
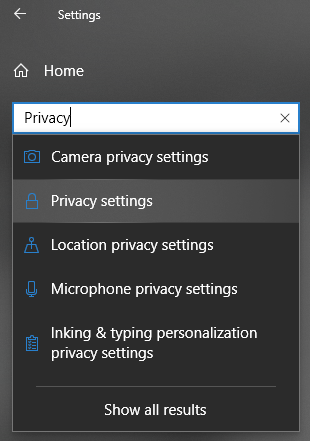
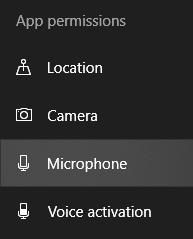
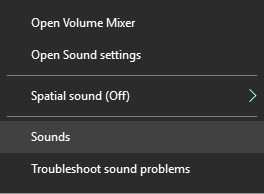
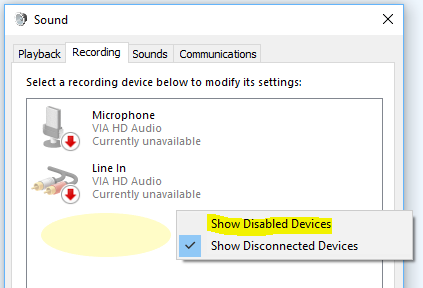
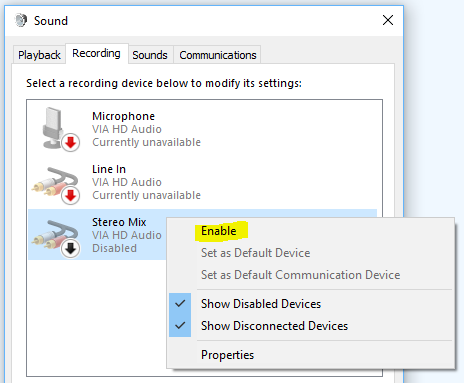
There Is A Long Delay When LEDBlinky First Starts Up?

The startup delay you're experiencing is most likely caused when LEDBlinky is loading your MAME.xml file which can be very large. As of LEDBlinky v6.6, a minimized version of the MAME.xml file will be automatically created to significantly decrease the startup delay. Upgrading to LEDBlinky version 6.6 (or later) should resolve this issue.

If you wish to continue using an older version of LEDBlinky, there are a couple ways you can minimize the startup delay; On the MAME Config tab, uncheck the "Preload MAME Data Files on Startup" option. This should allow LEDBlinky to load quickly. The MAME.xml file will be loaded the first time you select a MAME list or game. Basically, you're just pushing the delay to a later time after LEDBlinky has already started.

If that’s not acceptable, you can download an older version of MAME and generate a new MAME.xml file. Older versions of MAME use much smaller MAME.xml files. For example, the v.111 file is about 26mb and v.145 is about 66mb. With later version the file jumps to over 200mb. LEDBlinky uses the MAME.xml file as a secondary source of game data and the older versions should have little if any negative impact on functionality. If necessary, you can retain your current MAME.xml file for use with your front-end and keep the smaller MAME.xml in a separate folder for use with LEDBlinky.

Download older versions of MAME here. All you need is the MAME.exe file to generate the MAME.xml file using the -listxml command. See here for more info on using the -listxml command.


LEDBlinky Does Not Detect My Sound Card On The Audio Animation Tab?

From the LEDBlinky Configuration app, when you select the Audio Animation tab you may receive an error indicating "Invalid Audio Device" or "Error initializing Audio functions" and the the Audio Device and Input drop-down lists will be empty. You may be able to solve this issue as follows:

Windows 10:
  1. Right-click the Volume icon in the system tray and select "Open Sound settings". This will display the "Sound" window.

    screen example

  2. Under the "Input" section, click "Manage sound devices". This will display the "Manage Sound devices" window.

    screen example

  3. Under the "Disabled" section, select "Stereo Mix" and click the "Enable" button.

    screen example

  4. Click the Back arrow (top left) to return to the Sound settings window.

    screen example

  5. At the top right of the settings window, in the "Find a setting" field, type "Privacy", then click "Privacy settings". This will display the "Privacy" window.

    screen example

  6. On the left, under the "App permissions" section, click "Microphone". This will display the Microphone privacy settings on the right.

    screen example

  7. Enable the option to "Allow apps to access your microphone."

    screen example

  8. Run the LEDBlinky Configuration app, select the Audio Animation tab, and you should now have the "Stereo Mix" option as the Audio Device.

    screen example

    If you are still receiving an error and do not have the "Stereo Mix" option, you may need to upgrade your audio drivers or install a sound card rather than use the motherboard audio drivers.

Windows 7:
  1. Right-click the Volume icon in the system tray and select "Sounds". This will display the "Sound" dialog.

    screen example

  2. Click the Recordings tab. Right-click on any open space and you should see an option to "Show Disabled Devices". Enable this option.

    screen example

  3. You should now see "Stereo Mix". Enable this option.

    screen example

  4. Run the LEDBlinky Configuration app, select the Audio Animation tab, and you should now have the "Stereo Mix" option as the Audio Device.

    screen example

    If you are still receiving an error and do not have the "Stereo Mix" option, you may need to upgrade your audio drivers or install a sound card rather than use the motherboard audio drivers.


LEDBlinky Does Not Respond To Sounds On The Audio Animation Tab?

From the LEDBlinky Configuration app, when you select the Audio Animation tab and click the "Test" button; you should see the Equalizer respond to music or sounds currently playing on the PC. You can easily test this with any YouTube video.

If the Equalizer displays "No Audio Detected" and you are definitely playing some sounds, make sure your Audio Device is set to "Stereo Mix" and your Audio Input is set to "Master Volume". If "Stereo Mix" is not an option in the Device drop-down, please refer to the prior support link.

Note: For LEDBlinky to respond to sounds, it must use the Stereo Mix (or similar) output stream as the Audio Device. Windows may not enable the Stereo Mix output stream when using video and audio via an HDMI source. In this case you must use the audio output from the PC's analog headphone jack (typically 3.5mm).

If your setup must use HDMI for the video and audio output, the only solution for LEDBlinky to work is to use third-party software to configure multiple outputs. The following applications used in combination should allow for multiple outputs (HDMI and Analog), and direct the Analog output to LEDBlinky.
(Note: I cannot provide support or configuration for these apps)

  • Virtual Audio Cable (VAC) is an audio bridge between applications that transmits sounds (audio streams) from app to app.
  • Voicemeeter is Audio Mixer Application endowed with Virtual Audio Device used as Virtual I/O to mix and manage any audio sources from or to any audio devices or applications.


LEDs Light Correctly For Some MAME Games But Not For Others?

From the LEDBlinky Configuration app, on the MAME tab, confirm the correct path to the "MAME Folder". If you have MAME installed in more than one location, make sure LEDBlinky is configured to point to the same folder as is used by your front-end.

Another possible cause for this problem may be due to your MAME.xml file. The MAME.xml file must contain all ROMS including Clone ROMS. For example, "PACMAN" is a clone of "PUCMAN". If your MAME.xml has been altered to remove "cloneof" ROMS (such as "PACMAN"), LEDBlinky will not be able to light the controls correctly.

This simple solution is to recreate the MAME.xml file from your MAME.exe file using the -listxml command. See here for more info on using the -listxml command.

Note: If your front-end software also uses the MAME.xml file and does not need the Clone ROMs, you can maintain two copies of MAME.xml. Then point LEDBlinky to the complete (with clones) version and the FE to the cloneless version.

Another possible cause for this problem may be due to your version of MAME.xml. The MAME developers modified the structure of MAME.xml at version 0.162. If you are using MAME.xml version 0.162 or later you should upgrade LEDBlinky to the latest version.


MAME Start/Stop/Pause And Other MAME Outputs Are Not Detected?

Use the LEDBlinky MAME Output Test application (MAMEOutputTest.exe) to determine if LEDBlinky is detecting MAME outputs.

As of MAME version 0.170 the Output system was changed, breaking LEDBlinky's ability to detect MAME Start, Stop, Pause, and all individual ROM Outputs. The original Output system was restored in MAME version 0.176 but must be enabled from the MAME.ini file. Additionally, the Output system does not work in MAME version 0.221.

LEDBlinky will attempt to identify the version of MAME by locating the whatsnew.txt file in the MAME root folder. If the MAME version is 0.176 or later, LEDBlinky will attempt to locate the mame.ini file in the MAME root folder and modify the OSD Output Option to enable the original Output system.

If you are running MAME version 0.176 or later (and not 0.221) and have confirmed that LEDBlinky is not detecting MAME outputs (use MAMEOutputTest.exe), then it is likely that LEDBlinky was unable to enable the Output system. In this case, you must manually update your mame.ini file:

  1. Locate the mame.ini. This file is normally located in MAME's root folder. If the mame.ini does not exist, you can create it from your MAME.exe file using the -cc command.
  2. Edit the mame.ini file using any text editor (Notepad, Notepad++, VS Code, etc.). Locate the OSD OUTPUT OPTIONS section and set the output value to windows (case sensitive).
      #
      # OSD OUTPUT OPTIONS
      #
      output     windows
  3. Save the file and exit the text editor.

Reminder: The Output system does not work in MAME versions 0.170 - 0.175 and version 0.221.


Player 2 Buttons 5 And 6 Do Not Light Up For MAME Games?

MAME does not provide keycode defaults for P2B5 and P2B6 (or 7 or 8). If the buttons are functioning correctly, then the only explanation is that LEDBlinky does not have the correct path to the MAME "cfg" folder (see above). If the buttons are not functioning correctly (they don't do anything when pressed during game play), remap them using the MAME tab menu, then restart the game to light the buttons.


I'm Using A Joystick Encoder And The Game Control LEDs Do Not Light Correctly?

You need to use the correct joystick button codes for the LEDBlinky Input Map.

For example, the button wired to P1 Button 1 on the joystick encoder (like the GPWiz) should be assigned the input code JOYCODE_1_BUTTON1 on the input map.


I'm Playing A Trackball Game But My Joysticks Are Also Lighting Up (or vise-versa)?

There is an issue when using Player Specific control codes (see above) for MAME games with analog controls; MAME uses a default set of control inputs for both trackballs and joysticks - this allows trackballs and joysticks to be used interchageably. The problem arises when your control panel has both illuminated trackball(s) and illuminated joystick(s). Play a game like Centipede and the trackball and joysticks will all light up - and you only want the trackball to light up. To solve this problem, while playing each game (like Centipede), from the MAME Tab menu, edit the game controls and remove all references to joystick inputs. Quit and restart the game and LEDBlinky will only light the trackball!


MaLa Does Not Correctly Light The Buttons Assigned To The Left And Right SHIFT, ALT, And CTRL Keys?

Unfortunately, Mala doesn't distinguish between left and right for these keys so using the Input Map application you need to add the non left and right keycodes to each of these ports.

For example, a port could be assigned KEYCODE_LCONTROL and KEYCODE_CONTROL. But you only want to assign KEYCODE_CONTROL to one port. If you have a button that's LCONTROL and one that's RCONTROL, you'll have to choose which one LEDBlinky should light up.


HyperSpin Does Not Light Any LEDs?

Check the HyperSpin log.txt file to confirm that LEDBlinky is getting launched correctly. Confirm that the path to the LEDBlinky folder in the HyperSpin setup ends in a backslash; ..\LEDBlinky\


LEDs Return To Front-End Active Mode While Emulator Is Still Running A Game?

When using HyperSpin or other front-ends, you may find that seconds after starting a game, the LEDs revert from the in-game configuration to the front-end active configuration (even though the game remains active). This could also affect the UltraStik 360 or ServoStik configuration (assuming you are using LEDBlinky's JDR option).

In the case of HyperSpin, the exact cause of this problem is unknown but it appears that HyperLaunch/RocketLauncher or Xpadder cause HyperSpin to lose/gain focus and send an invalid 'GameQuit' message to LEDBlinky. To resolve the problem check the "HyperLaunch or RocketLauncher Used To Run MAME Or Other Emulator(s)" option on the HyperSpin tab in the Configuration app. If you don't see the option on the HyperSpin tab then please upgrade to the latest version of LEDBlinky.

screen example

If you're still having this issue, or are using a front-end other than HyperSpin, there is another work-around; Using the Controls Editor, edit the Emulator(s) that have the issue and select the "Ignore GameQuit Commands" option. When using this option your control panel may not immediately return to the front-end active configuration upon game exit, but should do so as soon as you scroll or select a new game.

screen example


Maximus Arcade Does Not Light Any LEDs?

Confirm that the Maximus Arcade config has LEDBlinky turned on and the correct path to the LEDBlinky.exe file. This must be done for each emulator.

screen example


Maximus Arcade Does Not Light The LEDs Correctly Or Repeats Each Animation Twice?

You must be using Maximus Arcade version 2.10 (official release, not the beta) or newer, and LEDBlinky version 3.8 or newer.


"Launch.bat cannot be written..." Error With Maximus Arcade?

This is a known bug with the Maximus Arcade code (the error is generated by Maximus Arcade). LEDBlinky has been modified to help minimize the issue and most users indicate that it only occurs intermittently. Unfortunately since Maximus Arcade is no longer supported, it's unlikely the problem will ever get resolved.


U360(s) Are Not Changing Maps For Each Game?

If your U360 joystick(s) are running firmware version 2.5 (or newer), please upgrade to LEDBlinky 6.2.2 (or newer).
How to determine the U360 firmware version:
1) Open Control Panel, System, Hardware, Device Manager, and expand the "HID Device" entry.
2) Right click on "HID Compliant Game Controller" and click "Properties".
3) Click "Details" and in the drop-down select "Hardware IDs".
4) There will be a "REV" number displayed which will be 0102, 0103, 0203 etc. For example 0205 means ver 2.5.

Use the following tools to diagnose issues with U360 joystick(s):

  • Microsoft Windows Game Controllers software (found in the Control Panel);
    From the Game Controllers dialog, select your U360 and click the "Properties" button. The Properties dialog will display the range of motion (X and Y axis) as you move the stick. The range of motion should be restricted based on the loaded map. For example, if the stick is loaded with the Analog map, the joystick cursor should have full range of motion. If the stick is loaded with the 4-Way map, the joystick cursor should only move to the top, bottom, left, and right.

    Start the Game Controllers app prior to starting your front-end software (with LEDBlinky). Then while playing a game, "Alt-Tab" over to the Game Controllers dialog and confirm the range of motion matches the expected map.

  • Ultimarc UltraMap software;
    The UltraMap software should have been provided when the U360 joystick(s) were purchased or can be downloaded from the Ultimarc.com site. Using the UltraMap application, try loading different maps to confirm the U360(s) can be remapped. The range of motion is displayed similar to the Windows Game Controller dialog.

  • LEDBlinky UltrastikTest app;
    The UltrastikTest.exe file is included in the \LEDBlinky folder. The UltrastikTest app can be used to load a map to all connected U360 joysticks. It uses the same functions as LEDBlinky to load the maps - so if the test app works, then LEDBlinky should also work. Use the UltraMap app or Windows Game Controllers software to confirm that the correct map was loaded.
    Note: If your OS is Windows Vista, Windows 7, Windows 8 (or newer) you may need to start the test app with "Run As Administrator" privileges.

  • LEDBlinky Troubleshooting app;
    The LEDBlinkyTroubleshooter.exe file is included in the \LEDBlinky folder. Select the "UltraStik" option from the "Problem" list. The app will analyze the debug log and report back any errors with the U360(s) and attempt to provide possible solutions.

  • LEDBlinky Debug Log;
    Use the LEDBlinky Debug Log to confirm which map LEDBlinky is loading for each game. Check the "Enable Debug Log" option (from the LEDBLinky Configuration Application, "Misc Options" tab). After running your FE and a MAME game, open the Debug.log file in your LEDBlinky folder using any text editor (Notepad, Notepad++, VS Code, etc.). Search for any instance of "Ultrastik". If LEDBlinky is configured correctly, you should find log entries similiar to this:

    [03/07/2012 22:55:37] UltraStik U360(s) detected: 1 Restrictor Type: None
    ...
    [03/07/2012 22:55:55] Set UltraStik JDR Map [vjoy2way.um] for DEFENDER.
    ...
    [03/12/2012 22:56:13] Set UltraStik JDR Map [joy4way.um] for FE.

If the U360 joystick(s) are correctly mapped for some MAME games but not for others, confirm that your MAME.xml file contains all ROMS including Clone ROMS. For example, "PACMAN" is a clone of "PUCMAN". If your MAME.xml has been altered to remove "cloneof" ROMS (such as "PACMAN"), LEDBlinky will not be able to set the U360 maps correctly. If this is the case, you can recreate the MAME.xml file from your MAME.exe file using the -listxml command. See here for more info on using the -listxml command.

If the U360 joystick(s) are not correctly mapped for any game, check the following:

  1. Confirm that the "UltraStik 360" option is checked (from the LEDBLinky Configuration Application, "Misc Options" tab).

  2. If your OS is Windows Vista, Windows 7, Windows 8 (or newer) you may need to start your front-end and/or LEDBlinky with "Run As Administrator" privileges.

  3. Confirm that all the U360's have the latest firmware. Instructions on how to identify the firmware version can be found here.
    It has been confirmed that firmware version 1.7 and older does not work with LEDBlinky.
    It has been confirmed that firmware version 2.3 and newer does work with LEDBlinky v6.2.2 and newer.

If problems persist, you may wish to contact Ultimarc support.


Ports On My iPAC Ultimate I/O Are Lighting Mixed Colors?

Using the LEDBlinky Simple Test application, each port on your iPAC Ultimate I/O should light up each RGB LED as Red, Green, or Blue. If you find that some ports (usually ports 1/2/3) are lighting a mixed color (such as yellow or purple), you need to use the Ultimarc WinIPAC application and un-check "enable high current drivers". If this does not solve the problem, please recheck your wiring.


"GameEx Does Not Light Any LEDs?

GameEx Arcade Edition only supports LEDBlinky with the 32 bit version. When installing GameEx Arcade Edition, uncheck the option to install the 64 bit version. Additional information can be found on the GameEx Forum.